
Backups are important, period. You will be needing these once your server or server provider suddenly dies. In this tutorial I will cover how to setup Google Drive backup, with Spatie’s backup package, Googles Flysystem and Laravel.
Requirements
- Laravel installation
- Google Drive storage
- Mysql dump application installed
- Basic knowledge about PHP and setting up packages in Laravel
Installation
We’ll start with installing Spatie’s backup package:
$ composer require spatie/laravel-backup
If you have auto-discover of or an older Laravel version, register the service provider your self in the config/app.php:
'providers' => [
     ...     Spatie\Backup\BackupServiceProvider::class
]
Publish the config file:
$ php artisan vendor:publish --provider="Spatie\Backup\BackupServiceProvider"
Schedule it in commands kernel:
// Backups (to Google Drive)
$schedule->command('backup:clean')->dailyAt('01:30');
$schedule->command('backup:run --only-db')->dailyAt('01:35');
Open up the app/backup.php and change the driver to use google’s driver:
'disks' => [
    'google',
    'local',
],
Install the Flysystem adapter for Google Drive:
$ composer require nao-pon/flysystem-google-drive:~1.1
Create a new service provider that provides the filesystem driver:
$ php artisan make:provider GoogleDriveServiceProvider
Then inside the boot() method add the google driver for the filesystem:
\Storage::extend('google', function ($app, $config) {
    $client = new \Google_Client();
    $client->setClientId($config['clientId']);
    $client->setClientSecret($config['clientSecret']);
    $client->refreshToken($config['refreshToken']);
    $service = new \Google_Service_Drive($client);
    $adapter = new \Hypweb\Flysystem\GoogleDrive\GoogleDriveAdapter($service, $config['folderId']);
    return new \League\Flysystem\Filesystem($adapter);
});
Register the GoogleDriveServiceProvider provider inside your config/app.php file.
Add the storage disk to your config/filesystems.php
return [

    // ...

    'disks' => [

        // ...

        'google' => [
            'driver' => 'google',
            'clientId' => env('GOOGLE_DRIVE_CLIENT_ID'),
            'clientSecret' => env('GOOGLE_DRIVE_CLIENT_SECRET'),
            'refreshToken' => env('GOOGLE_DRIVE_REFRESH_TOKEN'),
            'folderId' => env('GOOGLE_DRIVE_FOLDER_ID'),
        ],

        // ...

    ],

    // ...
];
Update your .env file:
GOOGLE_DRIVE_CLIENT_ID=xxx.apps.googleusercontent.com
GOOGLE_DRIVE_CLIENT_SECRET=xxx
GOOGLE_DRIVE_REFRESH_TOKEN=xxx
GOOGLE_DRIVE_FOLDER_ID=null
Get Google credentials
Getting these variables will require us to create an application in Google, this is not that hard.
Go to the google console: https://console.developers.google.com/
We will first have to get a Client ID and client secret.
Start by creating a new project at the dropdown at the top:

After you enter a name, it takes a few seconds before the project is successfully created on the server.
Make sure you have the project selected at the top.
Then go to Library and click on “Drive API” under “Google Apps APIs”:

And then enable the Google Drive API.
Then, go to “Credentials” and click on the tab “OAuth Consent Screen”. Fill in a “Product name shown to users” and Save it. Don’t worry about the other fields, you can leave these blank as they are not required for this tutorial.

Then go back to Credentials, click the button that says “Create Credentials” and select “OAuth Client ID”.

Choose “Web Application” and give it a name.
Enter your “Authorized redirect URIs”, preferably your test URL (http://mysite.dev) and your production URL (https://mysite.com) — or create a separate production key later.
Also add https://developers.google.com/oauthplayground temporarily, because you will need to use that in the next step.

Click Create and take note of your Client ID and Client Secret.
Now head to https://developers.google.com/oauthplayground.
Make sure you added this URL to your Authorized redirect URIs in the previous step.
In the top right corner, click the settings icon, check “Use your own OAuth credentials” and paste your Client ID and Client Secret.

In step 1 on the left, scroll to “Drive API v3”, expand it and check each of the scopes.

Click “Authorize APIs” and allow access to your account when prompted.
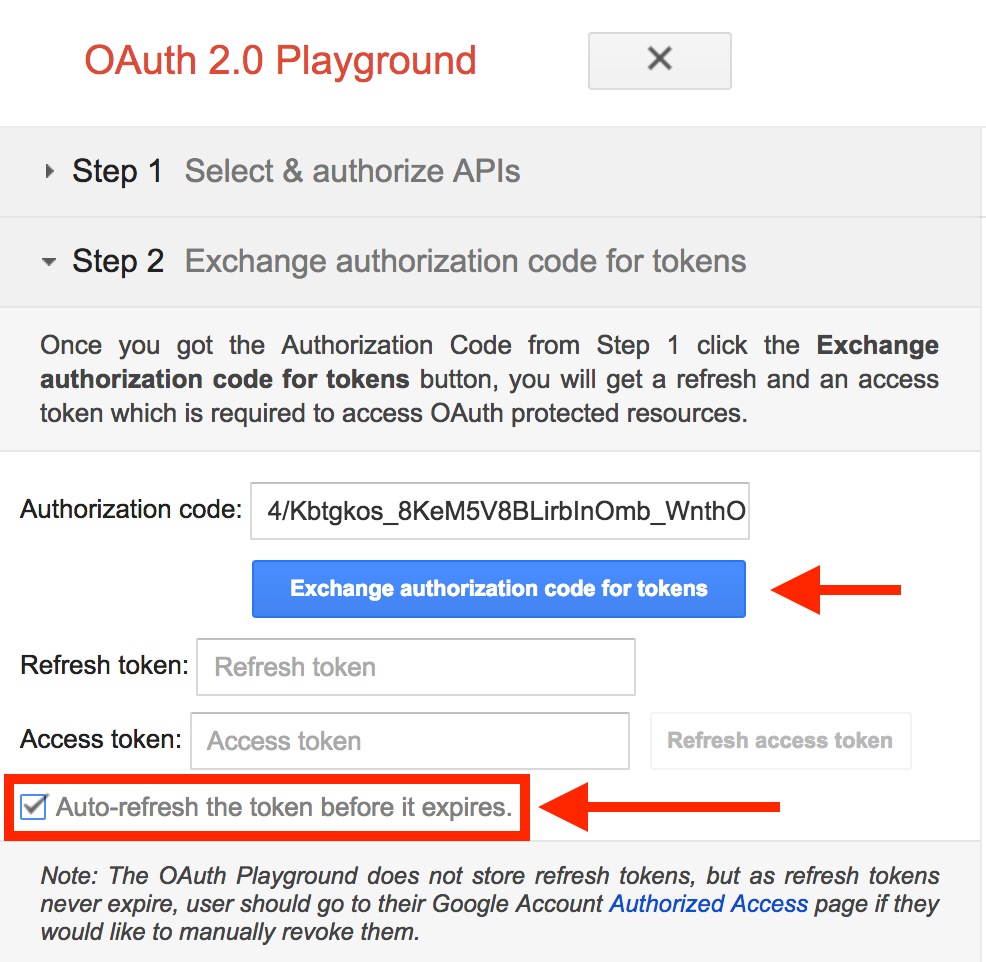
When you get to step 2, check “Auto-refresh the token before it expires” and click “Exchange authorization code for tokens”.

 When you get to step 3, click on step 2 again and you should see your refresh token.

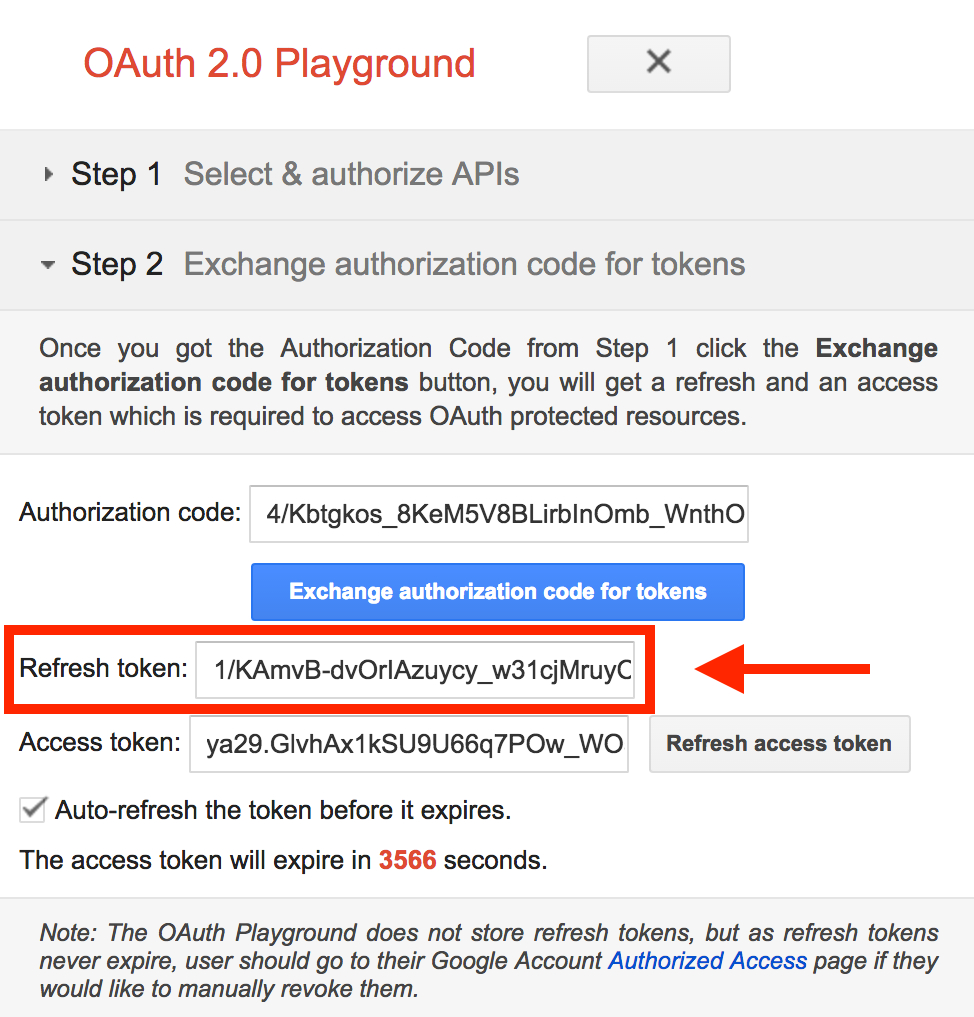 Add this refresh token to your .env file under: GOOGLE_DRIVE_REFRESH_TOKEN
Getting the folder ID in Google Drive where to store too
If you want to store files in your Google Drive root directory, then the folder ID can be null. Else go into your Drive and create a folder.
Because Google Drive allows for duplicate names, it identifies each file and folder with a unique ID. If you open your folder, you will see the Folder ID in the URL.

 You can add this URL in your .env file under the GOOGLE_DRIVE_FOLDER_ID variable. As said before, if you do not enter a ID it will store to the root.
Now lets check to see if it actually works, run this command to see if it worked:
backup:run --only-db
Thats it, you should now have automatic backups to your Google Drive in combination with the backup package from Spatie, and the Flysystem driver from Google. This will look like this:

 Resolving possible errors
If you encounter an error “File not found” you might want to set the name to a empty string inside the backup configuration file.
config/backup.php
'name' => env('GOOGLE_DRIVE_FOLDER_ID', ''),